
Related topics
▸ Introduction to the catalogue of tools
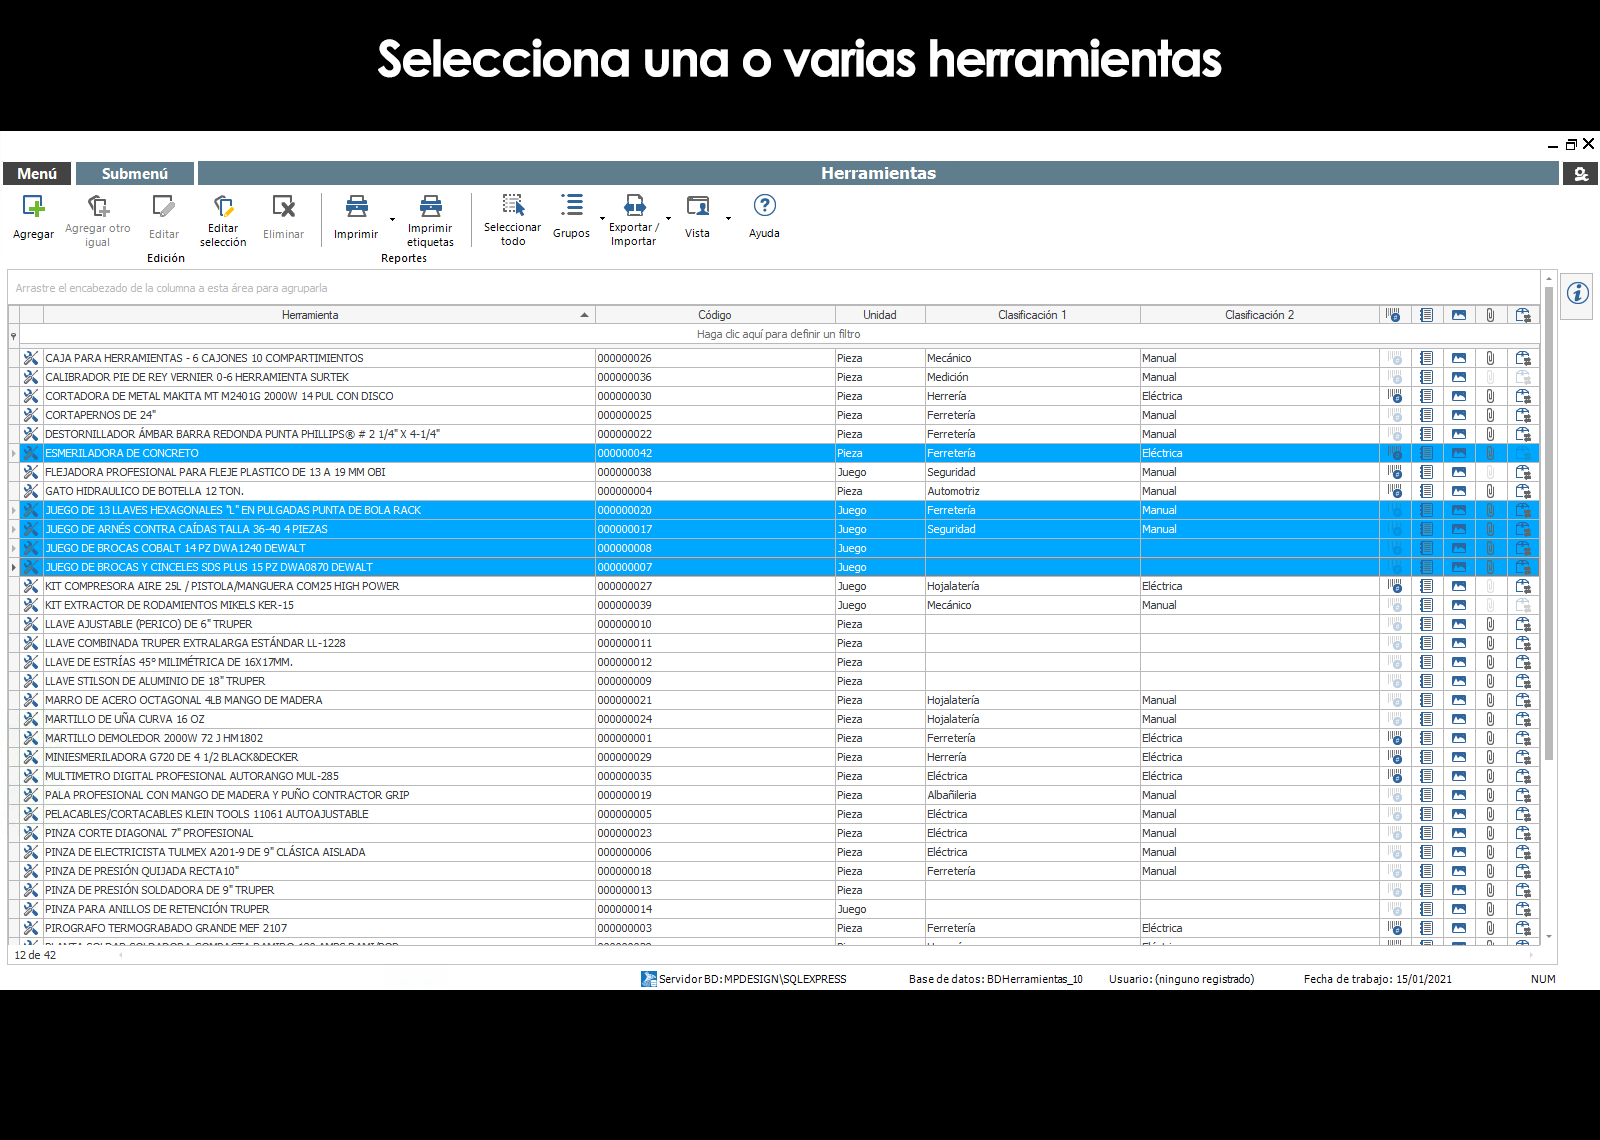
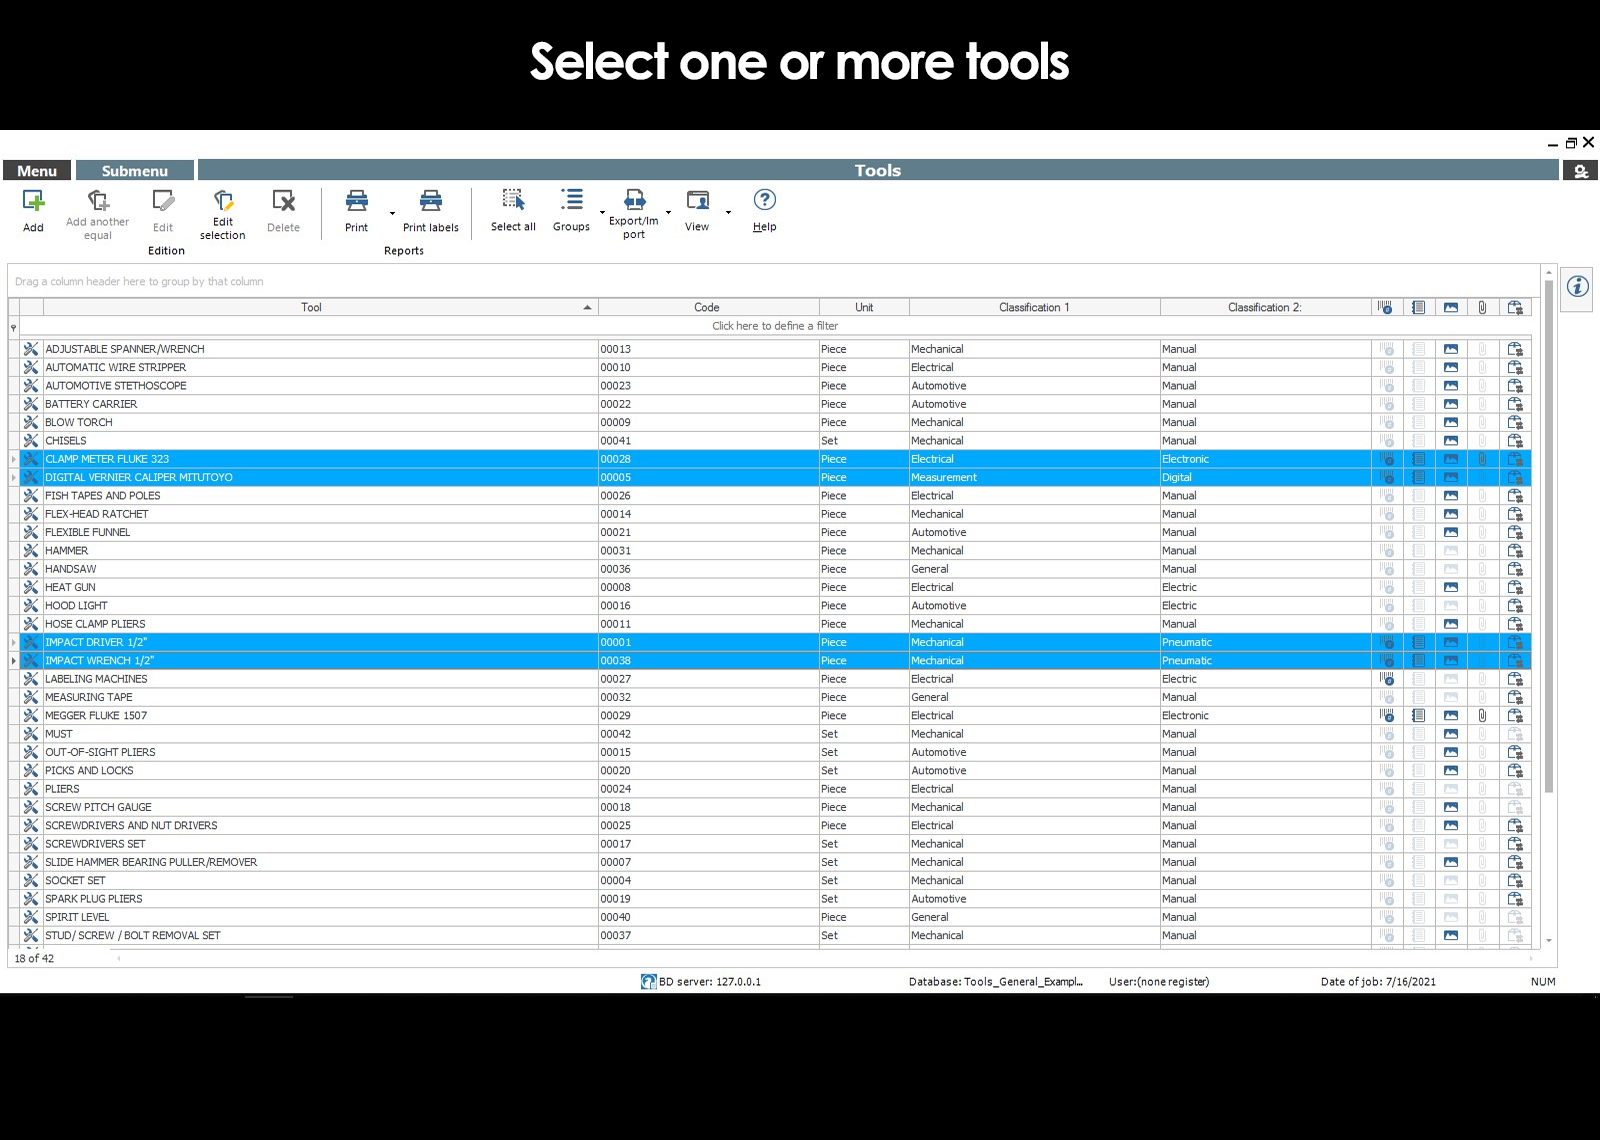
▸ View the catalog tools
▸ Information Panel tools
▸ Submenu of the catalogue of tools
▸ Description of the tool
▸ Code
▸ Unit of measure
▸ Ratings
▸ Specifications, images and attachments
▸ Catalog auxiliary images
▸ Catalog auxiliary attachments
▸ Stores that handle tool
▸ Location in the warehouse
▸ Stocks and start-up costs
▸ Tools controlled by serial number

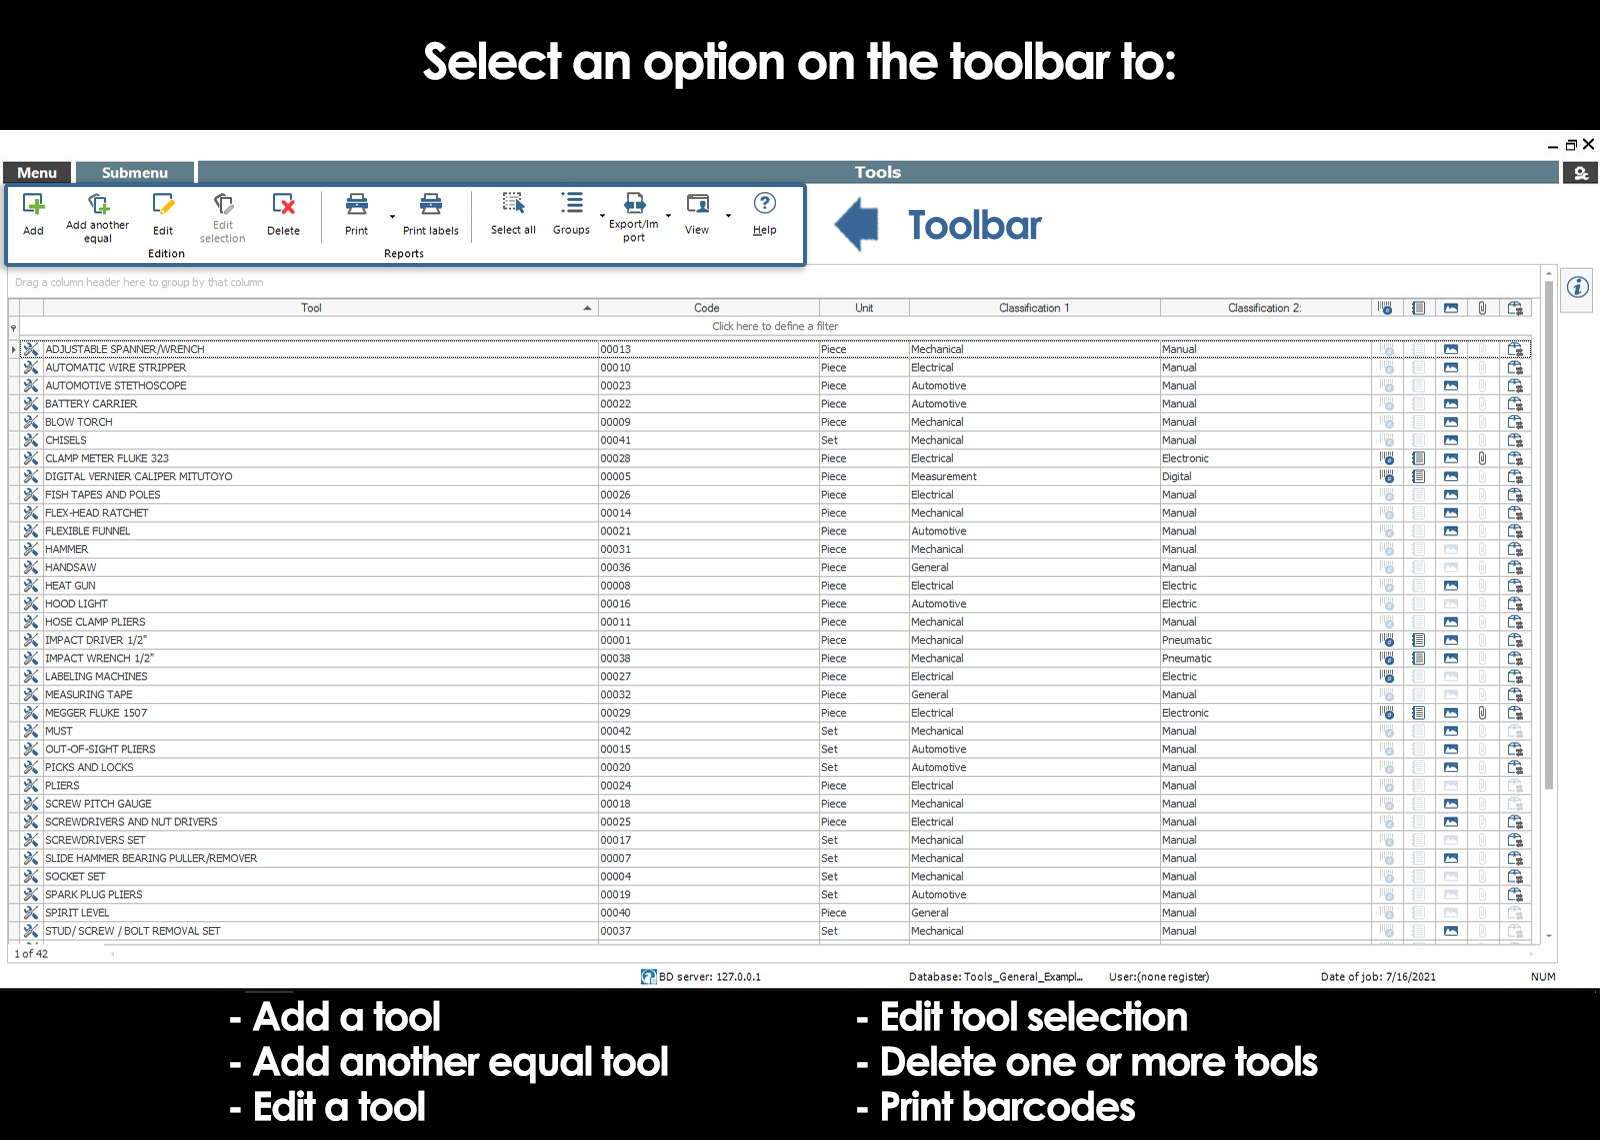
Add a tool
To add a new Tool, tap Add on the toolbar. A new screen will open with fields to capture and complementary information of the spare parts that you want to add to the catalog. In this way it is possible to have a catalog of easy access and with all the information related to each tool.
You'll be able to document the replacement: Description, Code, unit of measure, ratings, specifications, images, and attachments. In addition, you can specify the warehouse in which such tool is active. For more information click here.
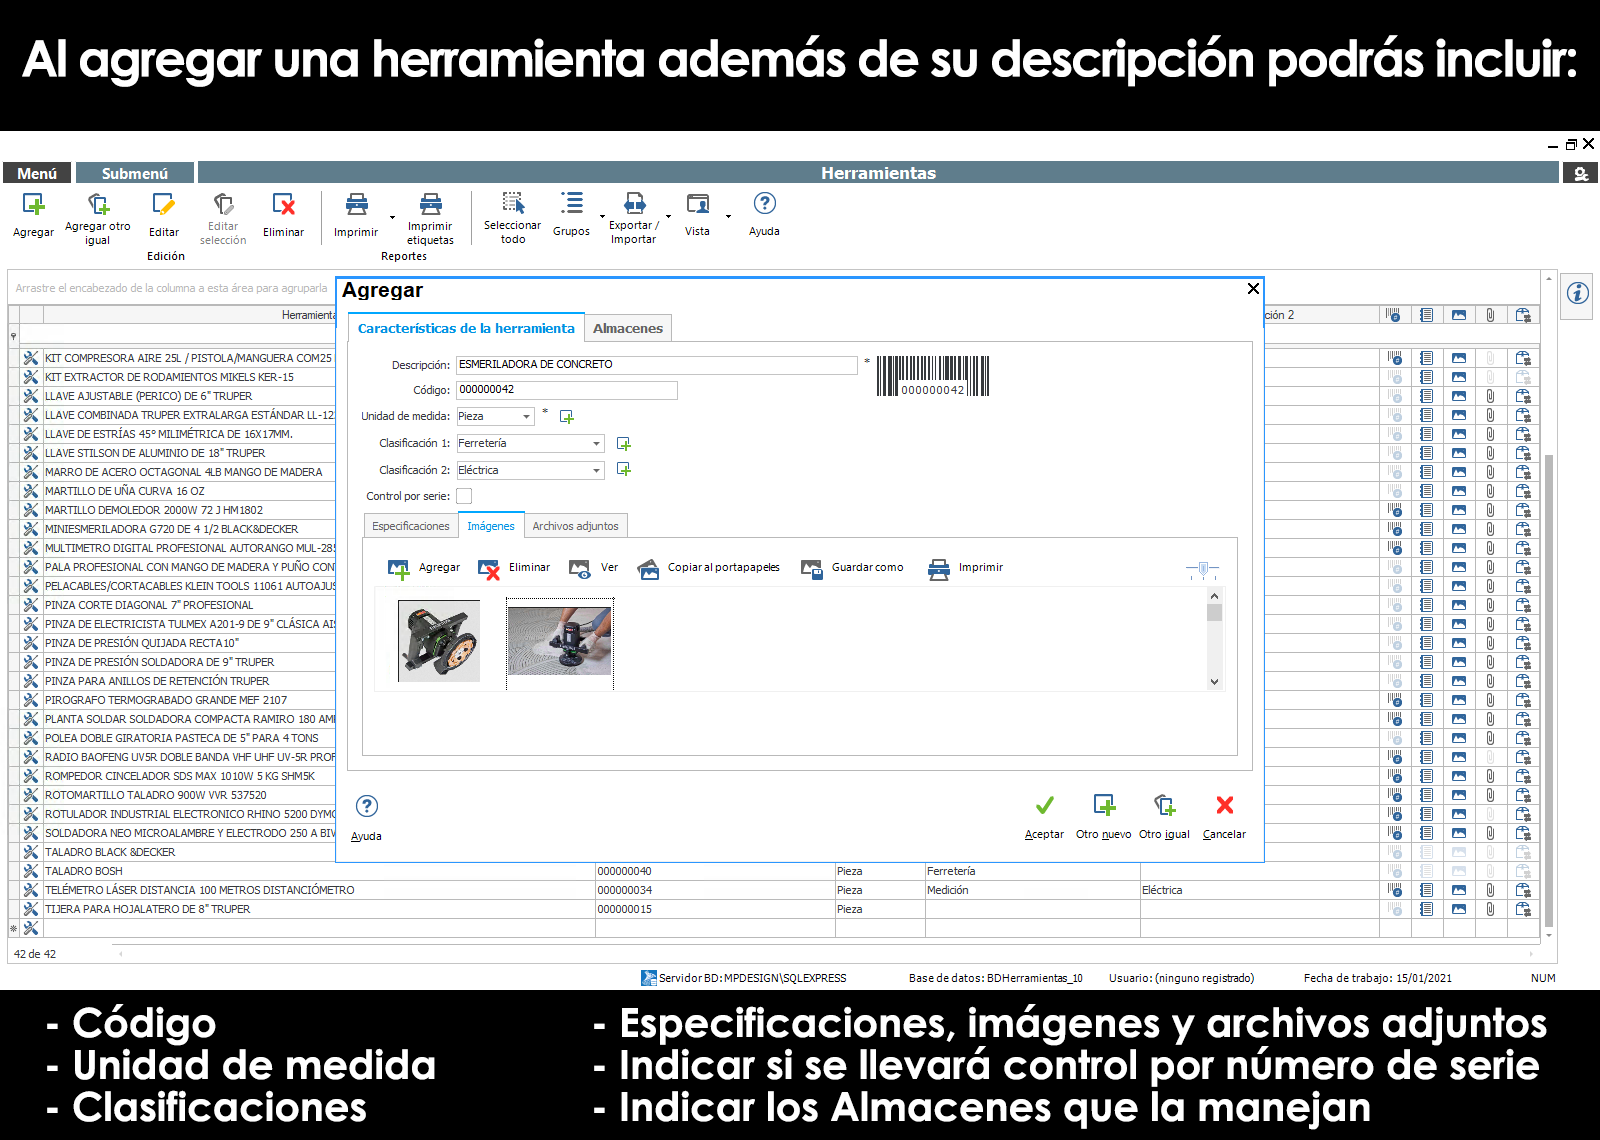
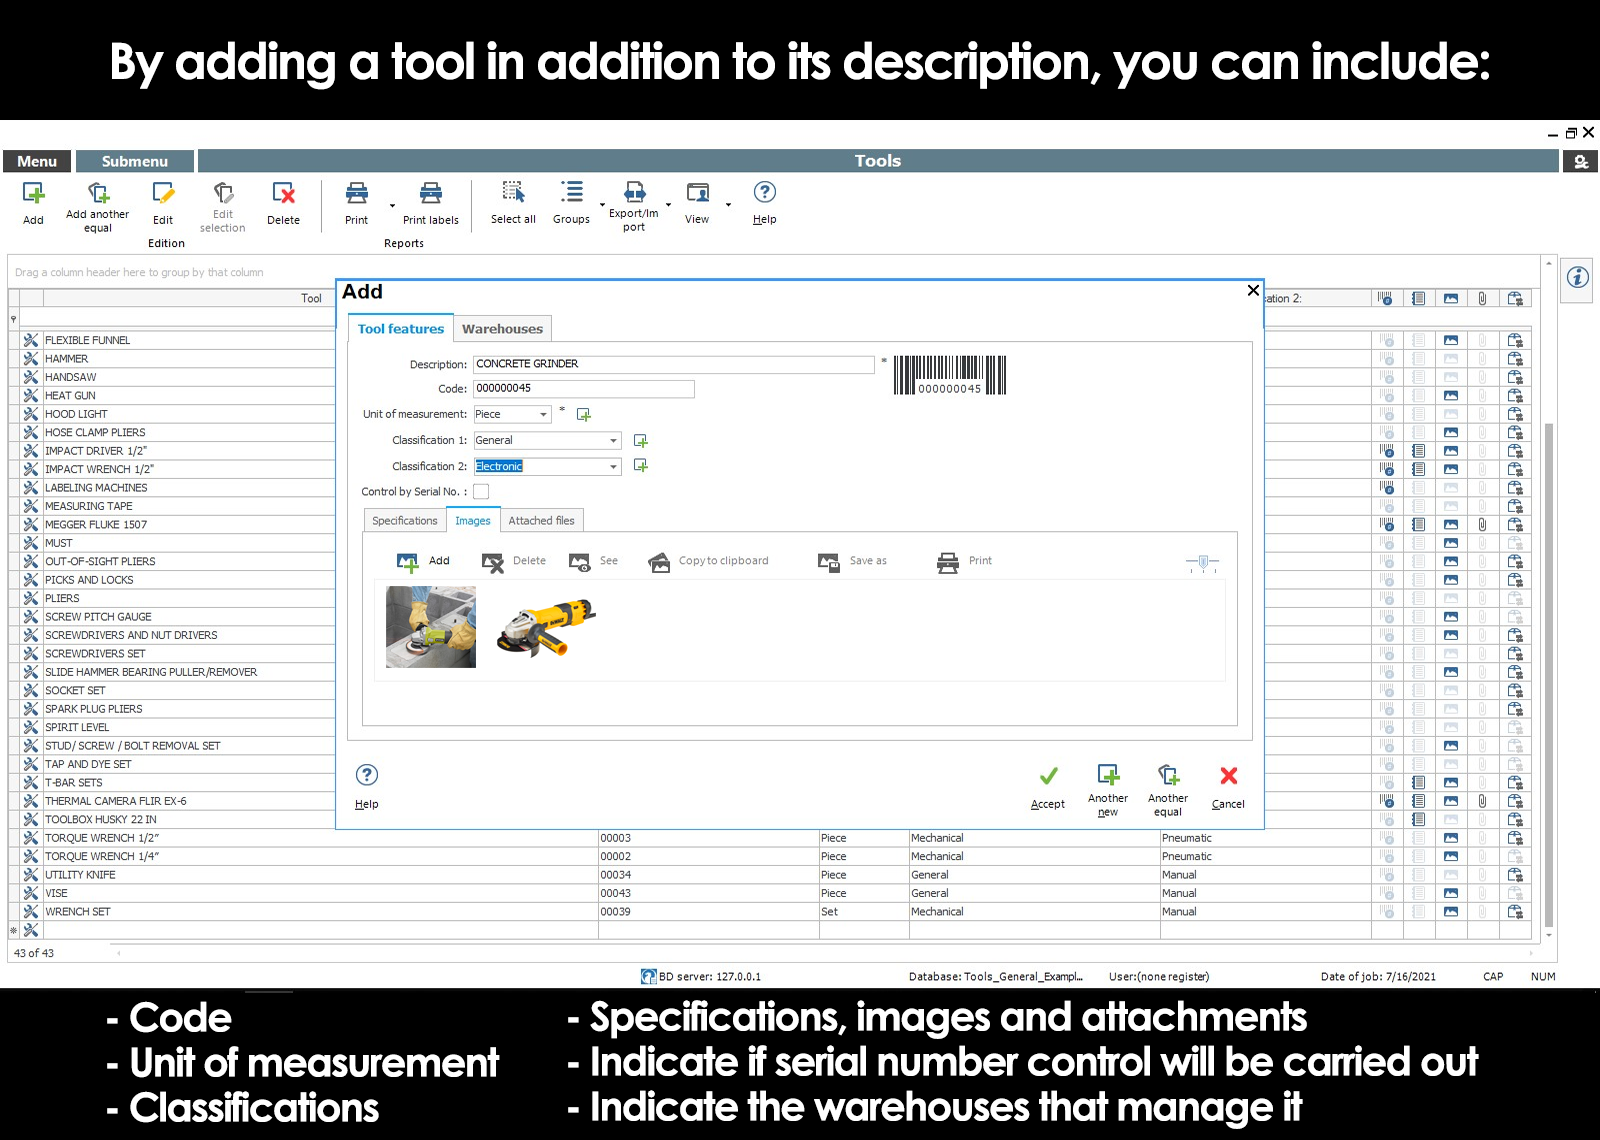
When you add a tool to the catalog, it is active in all the stores that you've created. If you want to clear a particular store you will be able to do in the tab “Stores“ checking and unchecking the tools that handles each store.
Add another one like it
This option is very useful when it is required to capture multiple tools with similar characteristics. It is necessary to modify the code because it is a unique and unrepeatable for each tool.
To edit a tool
To modify the information of a tool, select it in the catalog and click on the button Edit of the toolbar.
To remove a tool
To remove a tool from the catalog, select it and click Delete. You cannot delete a tool that has stock in a warehouse.
Multiple edit tools
Option Edit selection allows you to modify the information of several tools in a mesh, thereby making it an issue much more agile of multiple registrations, in comparison with the individual edition. For a better understanding of this tool it is strongly recommended to watch the video.
In the window “multiple Edit tools,” the MP enables the editing directly in the mesh of information. This allows you to select multiple cells and to establish, for example, the same drive to the selection by using the option To assign the same value.
Use the option Serialize values when you need to generate successive values (Eg. 001, 002, 003, etc). You can also set a prefix and/or suffix string for these values. The button Serialize values is enabled only when you select cells in the column code.
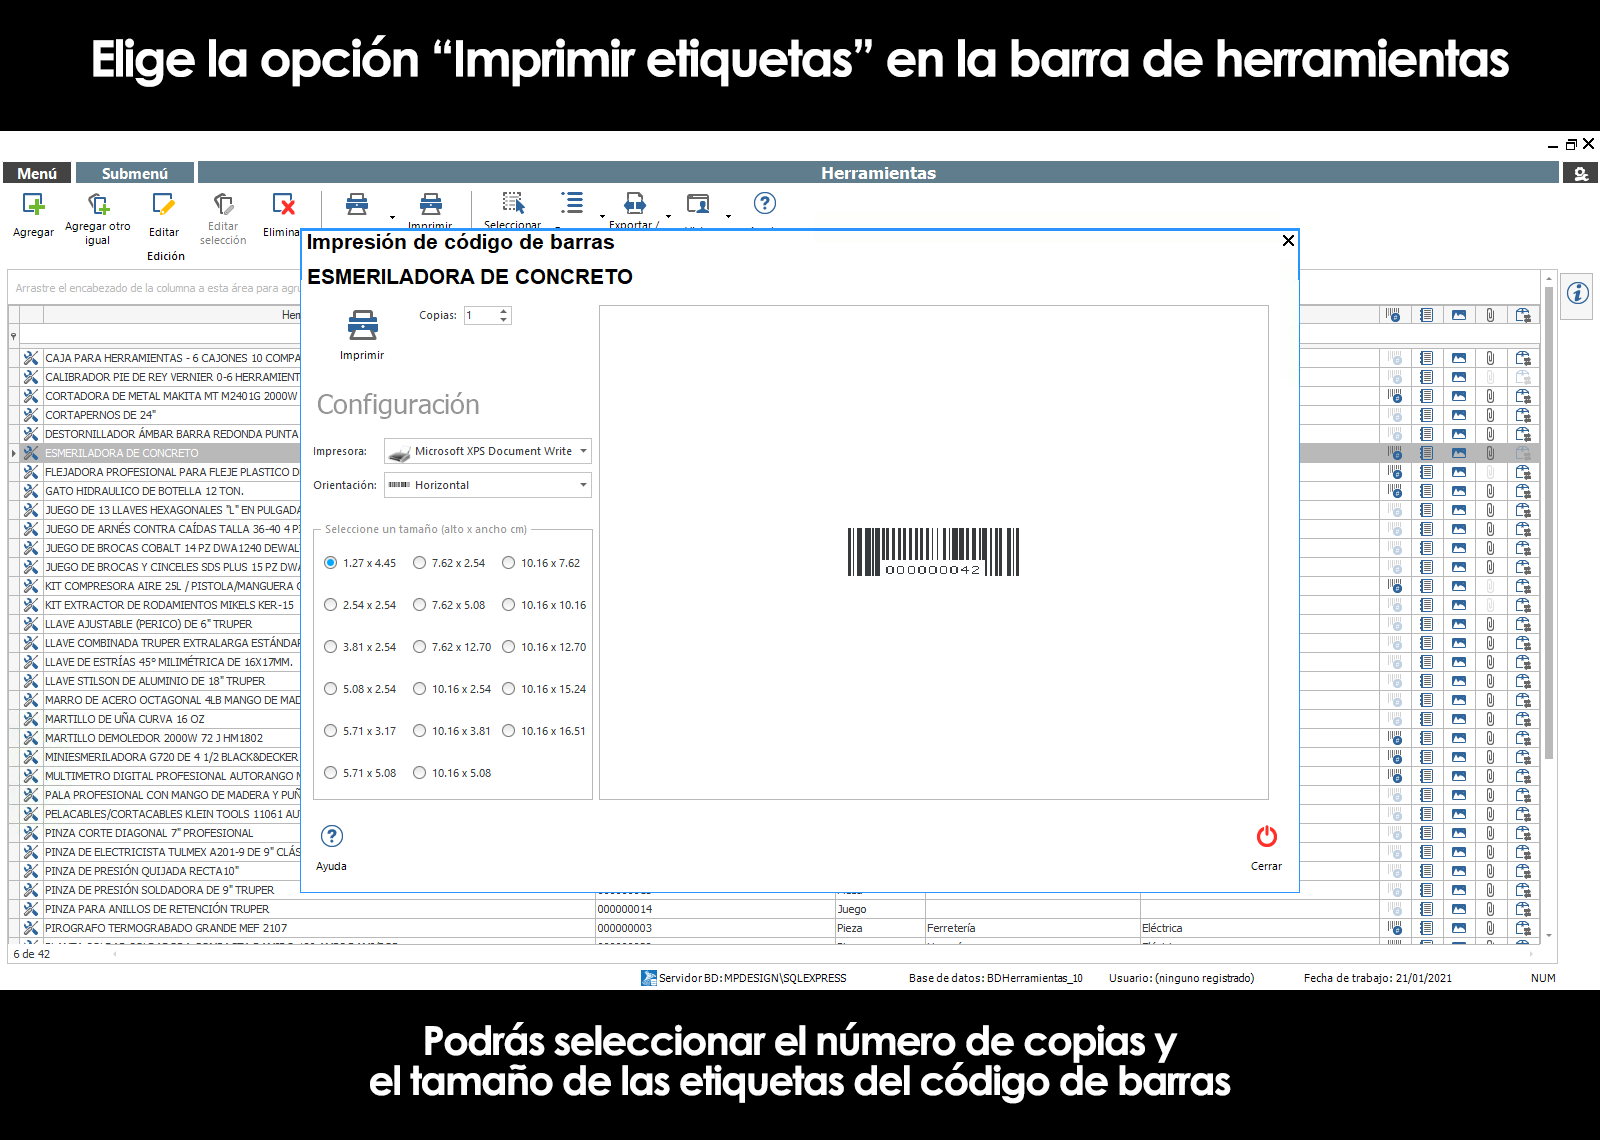
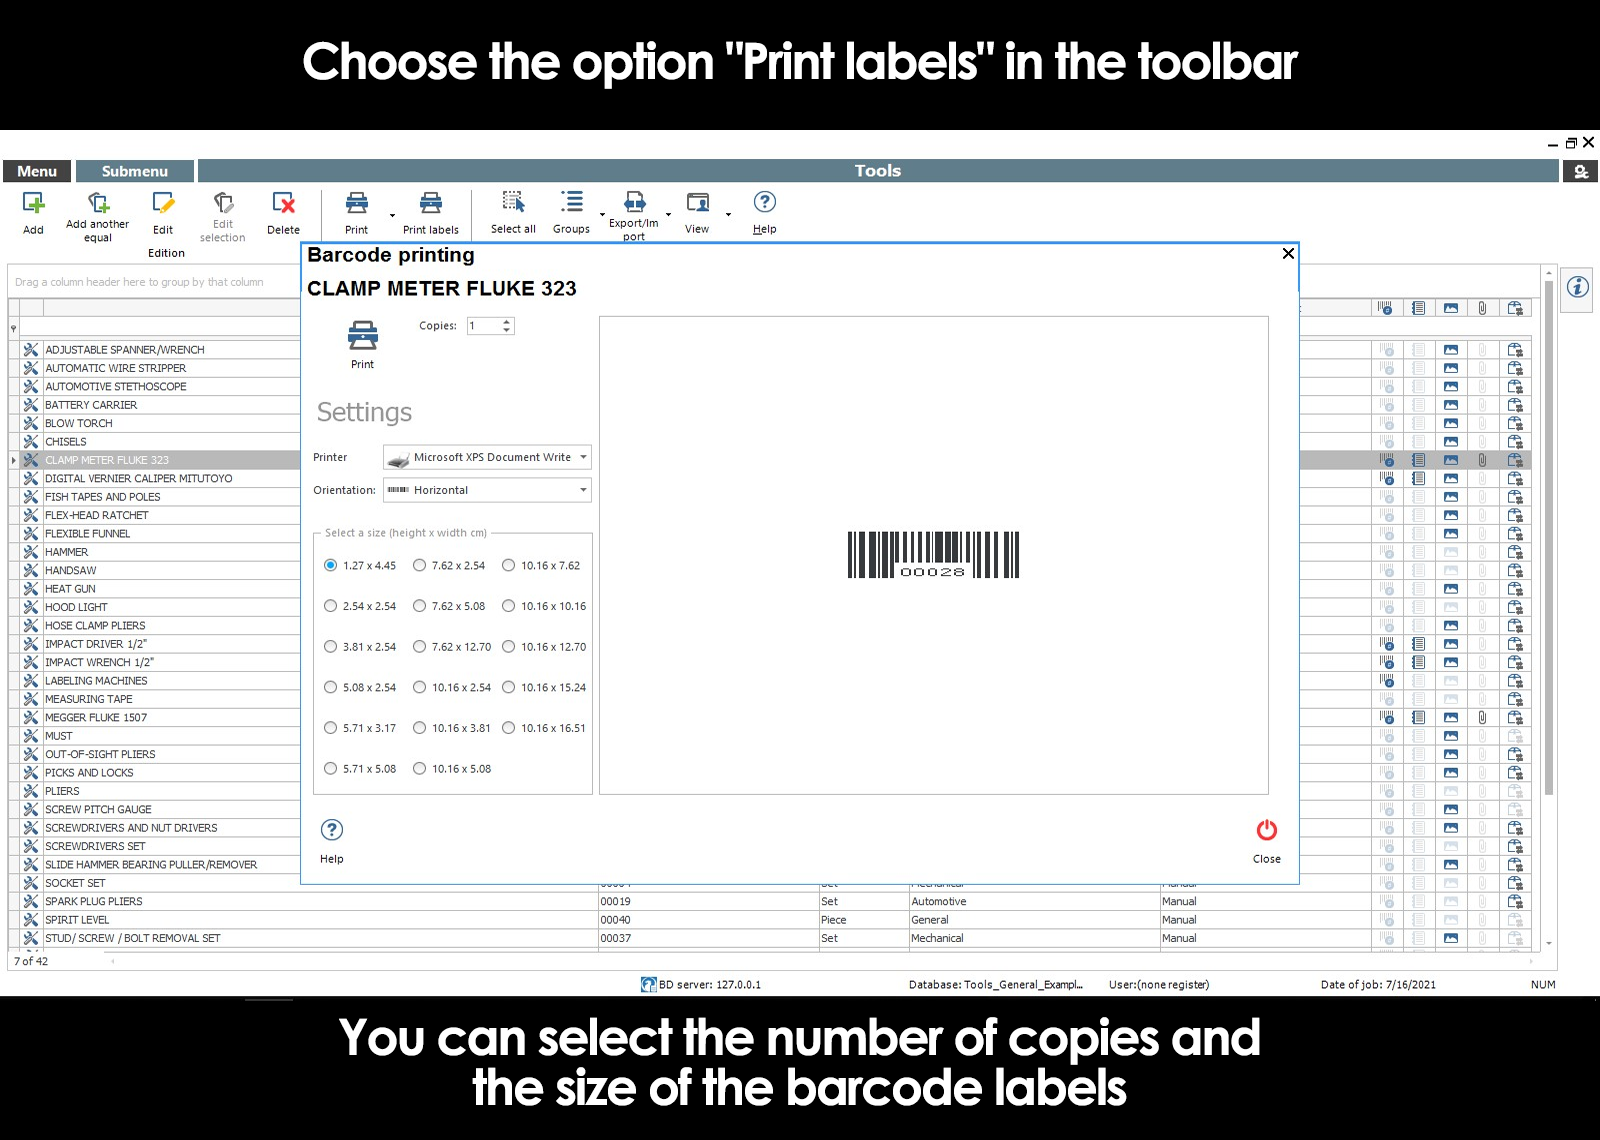
Print labels with barcode
At the time of registering a tool in the catalog, the user is assigned a code, with which the control program of tools generates a barcode and allows you to create and print labels. The use of labels with bar code serves to facilitate the process of searching for resources and to facilitate movement of entry and exit, as well as the guards and returns.
Suppose for example that we want to label with bar code a spare determined for easy identification.
Select the part and in the toolbar click on “Print label”. From this module you can print all the labels you want, paste them to spare to way to make well-documented, our spare parts in the warehouse. Subsequently, a barcode reader, we will be able to quickly locate any parts if we have them properly labeled.
Can't find the answer to your doubts or questions?
Please contact our technical support team
We offer FREE technical support via:
✅ Video conferencing
✅ Phone call
✅ E-mail
✅ Whatsapp
✅ Chat
Frequently asked questions
Please check our site frequently asked questions to learn more about the schemes of subscription, our wide range of connectivity options, solution of technical problems, etc..
Go to frequently asked Questions
Please contact our technical support team
We offer FREE technical support via:
✅ Video conferencing
✅ Phone call
✅ E-mail
✅ Whatsapp
✅ Chat
Additionally, we offer training courses
Our flexible options of online training and face-to-face will provide you with all the knowledge necessary to understand and implement your software maintenance MP.
Trading training packages
Additionally, we offer training courses
Our flexible options of online training and face-to-face will provide you with all the knowledge necessary to understand and implement your software maintenance MP.
Trading training packages
×

Server IP, user name and password of the database engine
Today, virtually all companies have at least one IT professional who is responsible for, among many other functions to manage the data and servers of the company. Among their functions include the administration of a database engine, which, for security reasons, has access by means of a user name and a password. If not, any person could enter the network, and provide high-databases, query, modify and even delete confidential information of the company.
For example:
| DATABASE ENGINE | ADMINISTRATOR USER BY DEFAULT | PASSWORD (Known only to the manager of IT) |
| MySQL | root | ****** |
| Microsoft SQL-Server | sa | ****** |
| Oracle | System | ****** |
| MariaDB | root | ****** |
| Firebird | SYSDBA | ****** |
When you create a database, or a new connection on the MP, the program prompts you for the server name or IP where you will create or is the database to which you want to connect to, as well as a user name and password.
The username and password that here we ask, are precisely those that allow access to the database engine permissions privileges to create the database.
Now, the administrator of the database can also create different user accounts to allow access to more people by giving them privileges and permissions custom.
With the aim of not to use the administrator user of IT and its respective password each time that the department of maintenance required to create a database or a connection to an existing database, it is recommended that the IT administrator create a user account specifically for the maintenance department.
A single user account to the database engine is sufficient for the creation and connection of multiple databases.
The username and password that here is requested, you do not have any relationship with the licenses of use are acquired or the amount of users that can access the database, so that a single user account can be enough, because in this case it refers specifically to the user and password of the database engine.